What is Talend CDC? - Demonstration of a Standard Replication
- Fredy Antonio Espitia Castillo
- Mar 24, 2023
- 7 min read
Updated: Mar 30, 2023
Talend CDC (Change Data Capture) is a tool that performs a data integration process that replicates and syncs data from one source to different targets in real-time. In a lot of business scenarios, it is required to keep databases synchronized, and there are many of those use cases that can be solved with Talend CDC, such as:
Keeping the DWH aligned with the latest data from transactional sources
Hybrid architecture needs to keep the cloud environment aligned with the on-premises data environment
A very performance-consuming replication system that needs to perform complex queries on specific columns of our data to find out if it is a new, changed, or deleted record.
A transactional database is used as a reporting source, thus affecting its performance.
Having an online backup
Having a distributed database

CDC can be used in different environments: on-premises, hybrid, or cloud, and it has connectors to different cloud providers such as Snowflake, AWS, or Azure, and managed services such as Kafka, AWS kinesis or Azure Eventhub. It also has connectors and support for on-premises servers such as IBM AS400, which is frequently used by financial entities and makes it unique in the market.
How does Talend CDC work?
CDC identifies the different changes that are in the source and replicates them in the target source. The replicated data comes from the different operations carried out such as:
INSERT
DELETE
UPDATE
The data sources that are producing changes can store logs with the transaction events that have been carried out on the data. These logs can be in different formats, varying according to the manufacturer.
The CDC agent works by monitoring and collecting those transactional events once, to store them in its own log files (Journal), in case it’s necessary to reuse them in different replication. However, this process is oblivious to system resources and does not interact with them.
In cases where we already have a database created and populated as a source, we will need to only do one full replication. From that point forward, Talend CDC will capture the changes made. It’s possible to apply scripts to the data in the source to select, transform or perform aggregations as well as apply changes to the target prior to integration.
Its configuration is done in a graphical console in which we select our source and target. It operates with different roles as:
Administrator
Operator
Viewer
The replicas are created in an environment, and there will be called models; a model contains the sources and targets; Once configured, we can add additional options for these, such as scheduling the executions, changing the framework with which we integrate, or supervising the job through logs in the tool or log files.
There are different frameworks with which CDC can do data replications, and each of them has additional capabilities, such as adding columns in the target, providing transformations, adding sequence identifiers, or even working with big data targets.
Demo of a Standard Replication
Initial Settings
In this blog, I will show a standard replica, so we will select the framework as “Free”, which means that no additional columns or data will be added to what is already in the source; I will be using Talend Change Data Capture version V 7.15 .0.
For this example, I have already created the source and target databases in SQL Server, which I named "training_source" and "training_target" respectively; in the source, I have a table called "students" while in the target, I have not created anything yet. Likewise, the configuration of Talend CDC towards the source and the different components necessary for the correct functioning of the tool are already installed, these are:
Capture Engine
Source Engine
Target Engine
Talend CDC Manager
32-bit ODBC connector for SQL Server in the DSN (Data Source Administrator)
SQL Server
Let's start:
We start by configuring the source in the File -> Source subscribe menu and fill in the data according to our source configuration:

Name (Alias): The name that you prefer
IP address: Is the location of CDC source engine where the DB instance connection has been defined, this setup was done during the CDC installation and configuration
Source type: The engine of the source DB
Instance or Server name: The one configured on your server
Then we notice that in the source it will show us "Training Source" with a green button that will help us to connect to it:

When we connect to that source, we will see that the different configured environments where we can create the models are shown, for this example, we will use Training as our environment:

Now we configure the journal, so we go to Source -> Journal Management
Right click on the created DB "training_source" and choose the option “Start DB logging process”
Then we can select the directory in which we want to store the journal and press Ok.

Still in Journal Management, we have to select the table we want to monitor and right click on it and then, press the option “Start table logging process for”:

Note: A primary key must be configured in the table to start the monitoring process on this.
After starting the monitoring process on the "students" table, we need to verify that the journal is working, for this we are going to make a slight change on one of the records on this table:

Note: We have changed John Doe's city to Miami instead of New York
Now again in the Journal Management right click on “training_source” and “Display Journal”:

We will see the only receiver available, which is the one written for the change we just made:

We select it and go to the "Posts" tab and from there we will see the changes that were made:

Note: The change of city is shown, the first record is "New York" and the second is "Miami" which guarantees the correct functioning of the journal.
Creating the Replication:
The first step is to create a configuration space within an environment; each replica within the same environment shares the same parameters and can be managed together.
In the "Environment" tab, click on "Add" and fill in the fields like the following example:

Environment: unique code of the environment to be created
Source code: Unique code for the source, must be 3 characters exactly
Environment type: For this example it’s “Training”
Description: It’s recommended to add a description
Click on “Add” and we will have the environment created:

Note: The environment contains a tab for the source where the model is created and another tab for the target. Additionally, three tabs where the replication properties will be displayed, and graphic elements of the replica to visualize the process.
Now from the “Source” tab right click on “Models” and then on “Add”:

And configure the model as follows:

Note: Two additional tabs “Table Options” and “Script” are shown, for which we will use the configuration set by default.
Model: A unique code for the model
Description: Description of the model
Type: For this replication, we use JOURNAL, however, there is EXTRACT that allows a full extraction
Click on “Add” and the model will be available in the “Models” folder in the “Source” tab of the “Environment”:

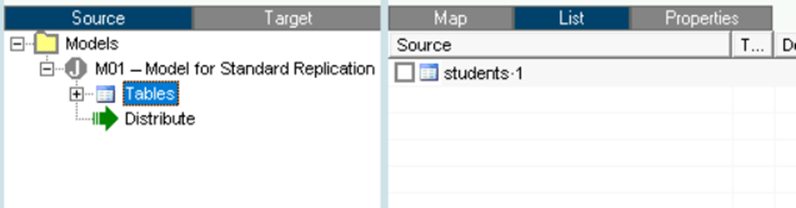
The next step is to add Tables to the model, expanding the Model on the [+] button, then right-clicking on “Tables” and finally clicking on “Add”

A window will appear to select the tables that we will add to the model:

Note: As you can see, we are using the "Free" framework that doesn’t generate additional changes to our data
With the "Query" button we can list all the available tables
Select the tables, in this case "students"
Move the selected table to the model
Finish
The table will appear created inside our model:
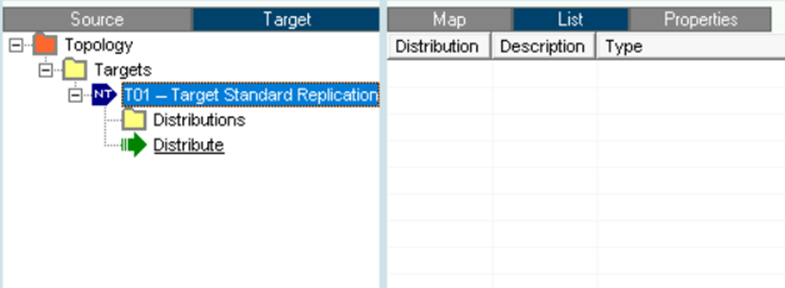
The next step is to create the target, from the "Target" tab of our environment we right click on "Targets" and then "Add":

The window for the new Target will open:

Target: unique code for the target
Description: Description of the target
Target type: default value
Name: Name of the instance of our target database
Address: address of the server where the target database is located
Exclude: it’s filled automatically as soon as we put the name of the instance
Then click on “Add”, and we will see our created target:

The next step is to create a distribution which means associating our model to a target, we can do it from the "Source" or "Target" tab; expand our created target or source, and click on “Distribute”:
And we move the Model from the left panel to the right and click on “Ok”:

A window opens automatically to finish the configuration of the distribution:

Select the type of database
Double-click on the connector
A window will open to enter the data from our target database
Click on “Ok” to add it
If the connection is correct, a notification window will show us "Connection Successful" and will show us the databases available there, and finally click on "Add":

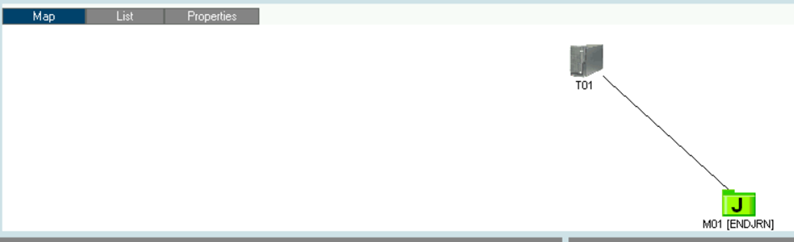
We can now see from the "Map" tab that the target T01 is associated with the model M01:

The next step is to create the target table, then from the "Target" tab we click on the "M01" model, then select the table to replicate, right-click on it, and finally "Create Target Table":

After this we will see that a new window appears showing the DDL of the new table using the target database:

Click on “Execute” and then we check in the target database to show that the table was created there, but it is empty:

Run Replication:
Now that the target, the model and the distribution are created, we must execute the replication; from the “Map” tab, right click on Model M01 and then click on “Properties”:

From the "Recovery" tab we select the "Load" check box

Then we go to the "Activity" tab, a confirmation window will ask us if we want to reload all the tables in that distribution, to which we will say "Yes".
Now from the "Activity" tab click on the "Start" button

After starting the replication, the fields of the "Counters" and "Last operation" section will show us the results and likewise, the distribution will remain active and waiting for any change that occurs in the source to replicate it automatically:

Note: As shown, we had 3 records in the source and those same ones were selected, sent and added to the target.
When the model is active, it will be green, otherwise it will be yellow, or it can be red if errors are encountered during execution:
Now it must be checked in the target table to show that the records were replicated:

Finally, we stop the replication by right-clicking on the model that appears in green and clicking on “Stop”.
Talend CDC offers many more features for real-time replication. In the previous example, we perform a simple replication with the same source and target fields, as well as a manual execution since they can also be scheduled.
In the next posts, I will show other features or functions that Talend CDC works with, as well as highlighting the differences with other frameworks available there.
Fredy Antonio Espitia Castillo
Talend Developer Certified


Comments